Layers and folders
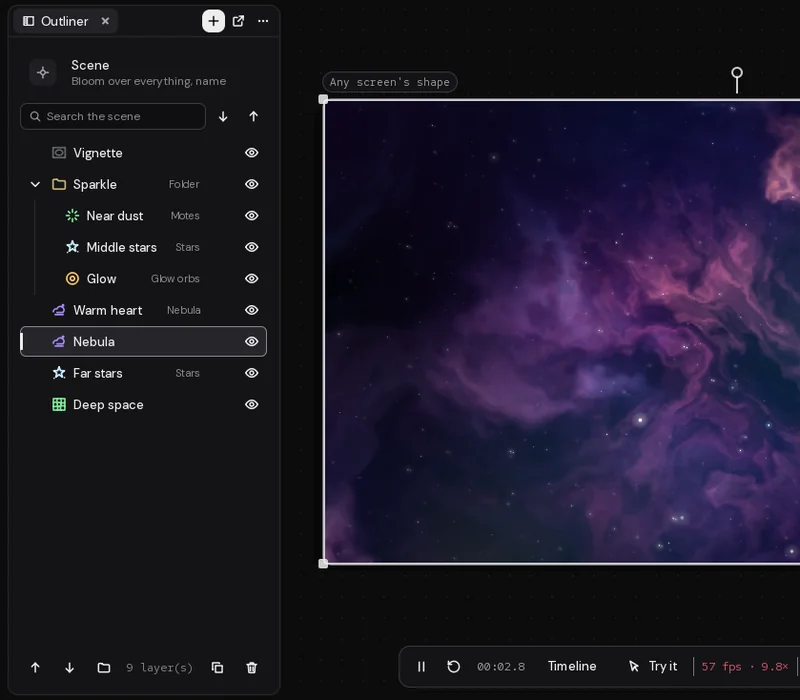
A scene is a stack of layers, drawn from the bottom of the list up, so the top of the list is in front. This page is about adding layers, keeping them in order and in folders, and placing them on the preview. Every kind of layer has its own page in the layer reference.
Try it: Two Galaxies (blend modes), Nebula Drift (gradients, a nebula and stars).
Adding a layer
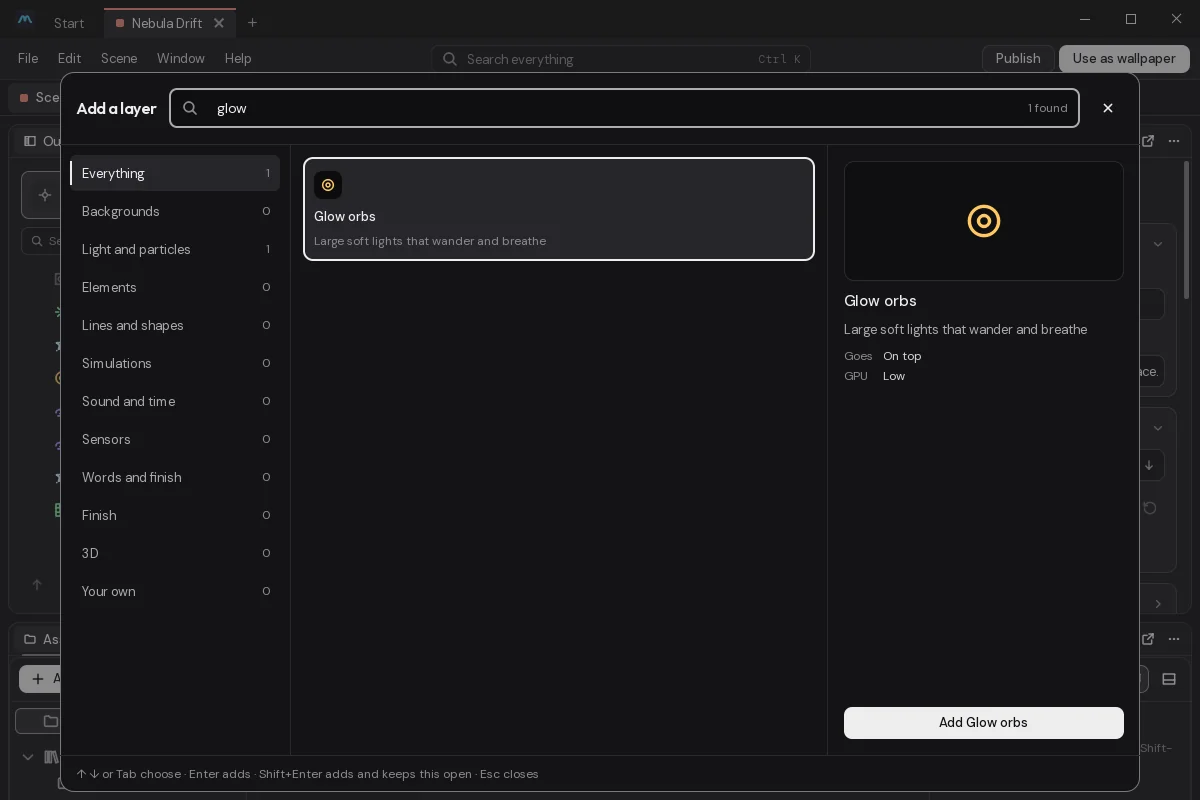
- Click the + in the Outliner's tab (Add a layer), or Add one in an empty scene. The layer gallery opens.
- Type in the search ("glow", "particles", "clock"): it matches names first, then descriptions. Or pick a category down the side; Everything shows them all.
- Click a tile to see what it does, where it goes, how heavy it is for the graphics card (GPU: Low, Some or High) and whether it can move to the sound.
- Add, double-click the tile, or press Enter to add it. Up, Down and Tab move between tiles; Esc closes.
You can also add a layer from the command palette (Ctrl+K, then "Add Rain"), or drop a picture or a video on the preview.
Where it goes
A new layer goes above the layer you have picked, in the same folder. With a folder picked, it goes into that folder, at its top. With Scene picked, it goes on top of everything.
What some layers start with
- A Picture or a Video asks for its file straight away.
- Glow orbs, Light rays, Stars, Rain and Pointer light start with their blend set to Light, so they glow.
- Paths starts with a board of lines to replace with your own.
- An Adjustment layer starts as a colour grade.
- A Shader starts with an example and opens its code editor; a Web project opens its files.
The kinds of layer
The gallery's categories:
- Backgrounds: gradients, nebula, mesh gradients, the real sky where you are, fractals, pictures, slideshows, videos, web pages, pictures with depth, puppet warp, sprite sheets, and other scenes as a layer.
- Light and particles: the Particle system (start it as motes, rain, a light that follows the pointer, fireworks or 3D particles), glow orbs, light rays, stars, lens flares. See Particle systems.
- Elements: fire, lightning, a water surface you can touch, fog and clouds.
- Lines and shapes: paths, waves, grids, shapes, falling code, blobs, ribbons, plexus, tunnels, Lottie animations.
- Simulations: reaction-diffusion, cellular automata, fluid, flocks, physics.
- Sound and time: a sound visualizer, sounds, clock faces, and Desktop info (now playing, a system monitor, your calendar, the weather).
- Words: text and clocks.
- Finish: a vignette, Adjustment layers, glass and a lens, over what's below.
- 3D: a 3D scene. See 3D scenes.
- Your own: Shader layers and Web projects. See Materials and shaders and Web pages and projects.
A Scene layer plays another scene inside this one. It can name one of your scenes, one that comes with Motion, or a scene kept in a folder inside this scene's own, by its path there (parts/window): that one goes with the scene when it's saved as a .motion file or published to Motion Hub. It can't reach outside those folders.
Two kinds draw nothing of their own. An Adjustment layer applies its effects to every layer beneath it, so one at the top grades the whole scene (see Effects and masks). A Folder keeps layers together.
The layer list
Each row shows the layer's name, its kind when there's room for it, and an amber mark when something moves its settings. Search the scene, above the list, finds layers by name; the arrows beside it unfold or fold every folder.
- Click a row to pick the layer. Its settings show on the right.
- Double-click the name to rename it. Enter keeps the new name.
- The eye hides the layer while you work, and shows it again. A hidden layer is greyed in the list and isn't drawn, on the desktop too.
- The lock shows when you hover over a row. A locked layer can't be moved, sized or turned on the preview, and the arrow keys leave it alone; you can still change its settings. A locked layer keeps its lock showing.
- Right-click a row (or hold it on a touch screen) for its menu: New folder, Put in a folder, Out of the folder, Unfold the folder, Into each folder it could go in, Make an object of it, Make a template of it, Duplicate and Delete.
Under the list, with how many layers there are:
- Move up and Move down move the layer past the next layer or folder beside it (Ctrl+Up and Ctrl+Down).
- New folder (Ctrl+Shift+N).
- Duplicate (Ctrl+D): a copy, named with "copy" on the end, right above the original. A folder is copied with everything in it.
- Delete (Delete). A folder goes with everything in it. Ctrl+Z brings it back.
Scene, above the list, isn't a layer: pick it for the settings of the whole wallpaper (its name, the bloom over everything, the finish). See The inspector.
Folders
A folder keeps layers together. It draws nothing itself.
- New folder makes an empty one where a new layer would go.
- Put in a folder (Ctrl+G) puts the picked layer into a new folder in the same place.
- Into a folder (in the right-click menu, or "Into folder" in the palette) moves the layer to the top of that folder.
- Out of the folder (Ctrl+Shift+G) moves it out, to right above the folder.
- Unfold the folder (Ctrl+Shift+G with the folder picked) takes everything out, where the folder was, and drops the folder.
The arrow beside a folder folds it away in the list, or opens it. Folding is only in Studio: it changes nothing in the scene.
Hiding a folder hides everything in it, and locking a folder locks everything in it. Folders can go inside folders.
A folder as an object
A folder has one setting, Is an object of: one of the scene's classes. When the scene starts, the folder becomes an object of that class, and the class's graph can change the layers in it. See Visual scripts.
The preview
The picked layer has an outline on the preview, with handles:
- Drag anywhere on the preview to move the picked layer. Near the middle it snaps to the centre lines, which show while it does; hold Shift to place it freely.
- Drag a corner to make it bigger or smaller, from 5% to 300% of its size.
- Drag the round handle above it to turn it. It turns in steps of 15°; hold Shift to turn it freely.
- Scroll over the preview to size it.
- The arrow keys nudge it a little; with Shift, ten times as far.
Clicking on a piece of text or a shape picks that layer, as long as it isn't hidden or locked. Other kinds fill the screen or move by themselves, so pick them in the list.
Moving, sizing and turning set the same numbers as the Placement card in the settings (Left and right, Up and down, Size, Turn), which you can type in instead.
While Try it is on (under the preview), the pointer and clicks go to the scene instead, as they would on the desktop: use it to try a layer that answers the pointer.
Drawing lines
With a Paths layer picked, its lines show on the preview. Click Draw in its settings, then click to add points; double-click or press Enter to finish a line, and click its first point to close the shape. Lines snap to 45°; hold Shift for any angle. Drag a point to move it, and right-click a point to remove it. Circuit makes a board of lines, Trace a picture finds the edges in a picture and turns them into lines, and Clear takes them all away.
What every layer has
Besides its own settings, every layer has the same cards: Layer (opacity and blend), Placement, Motion, Interaction and Mask, and the quick effects on the Effects tab. The inspector goes through them.
Last changed 2 November 2026. Something wrong here? Tell us.