Studio's window
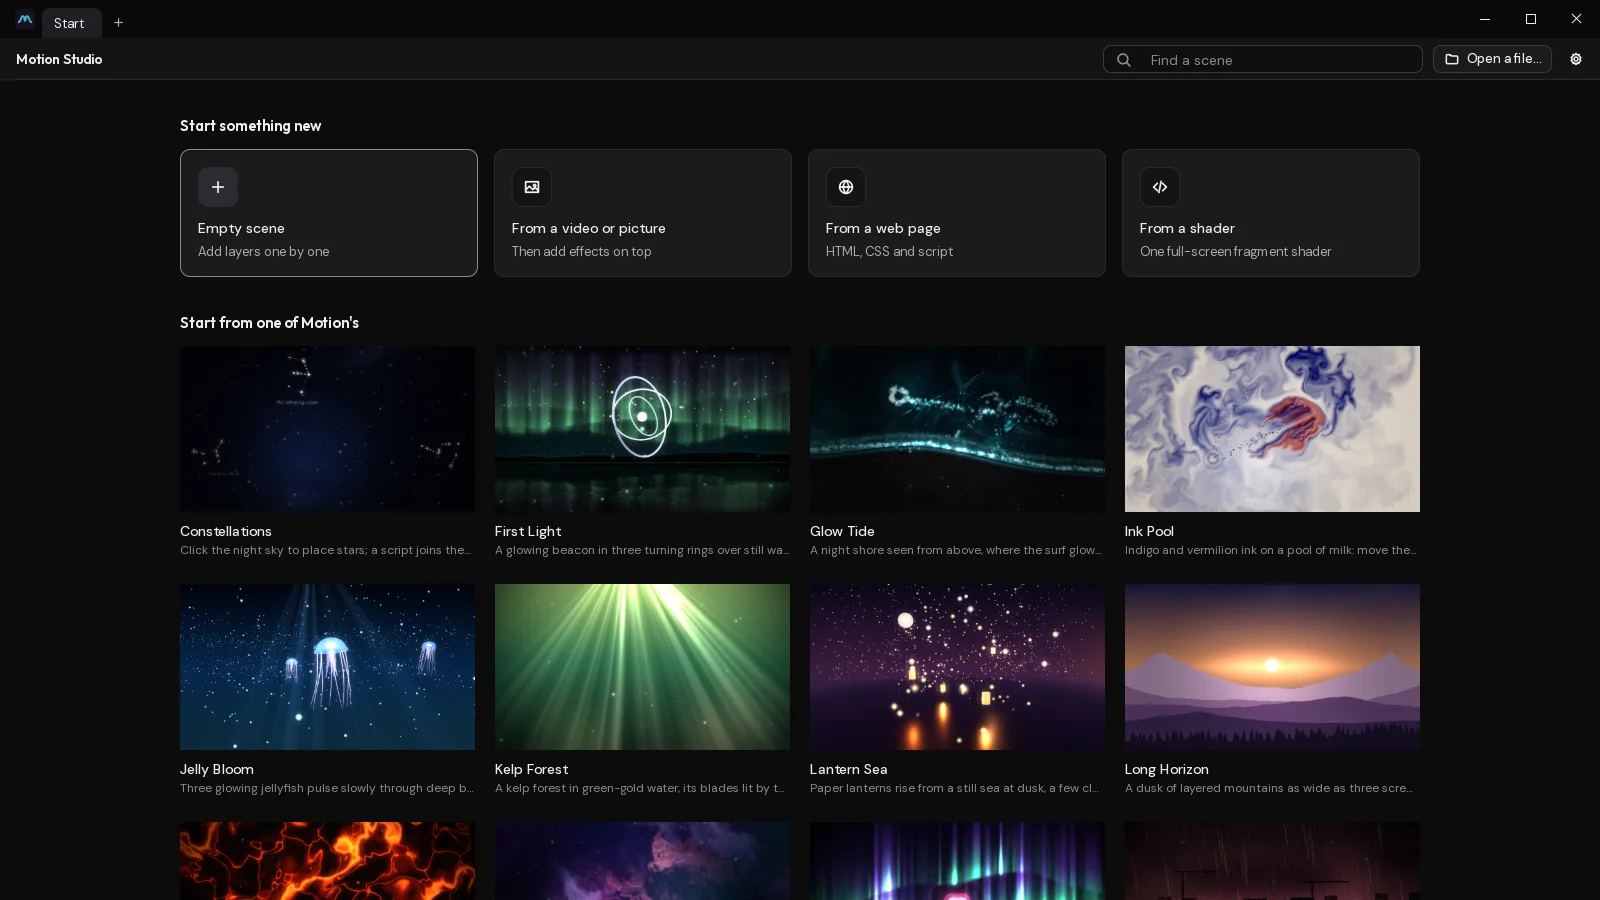
Studio opens on its start screen, where you begin a new scene or open one of yours. This page covers that screen, opening scenes and files, and how the window is laid out: a tab for each scene, the Scene tab with the Outliner on the left, the preview in the middle, the settings on the right and a dock across the bottom, and the editors as tabs of their own.
Signing in
Studio works without an account, offline too. You only need a Motion Hub account, the same one Motion Player uses, to publish a scene on the Hub. To sign in, use Sign in to Motion Hub on the Publish page or in the command palette (Ctrl+K), then pick Sign in with Discord, Sign in with Steam or Email or name, or Google (Motion Hub's own sign-in page). Your browser opens on the Hub with a code to approve, and Studio carries on once you've approved it. If the browser didn't open, use Open the page again or Copy the link into another one. Not now closes it.
The start screen
The start screen shows when Studio opens with nothing to open, and whenever you click the Start tab or the + beside the tabs, at the top of the window. Ctrl+N opens it too. Under the tabs it has a bar of its own: Find a scene, which searches your scenes and Motion's by name, description and tags, Open a file… (see below) and the gear for Settings. Esc goes back to the editor.
Start something new
- Empty scene: a new scene to add layers to. It starts with a few to work from (an aurora gradient, glow orbs, motes, the time and date, a vignette); delete the ones you don't want.
- From a video or picture: pick a file, and it's the first layer. Then add effects on top.
- From a web page: a new scene with a Webpage layer.
- From a shader: a new scene with a Shader layer, its code editor open. See Materials and shaders.
Your scenes
Under that are your own scenes, newest first, each with a picture of how it looked when it was last saved and when that was. Click one to open it as you left it. With none yet, this isn't shown.
Start from one of Motion's
The twenty scenes that come with Motion, each built round one part of it: particles, 3D, a model made in code, shaders, effects, blend modes, the clock, sound, scripts, objects with physics, the pointer, keyframes, web pages and spanning screens. One opens as a copy, so saving makes a new scene of your own and the original stays as it was, and you can take it apart and change it. The docs have a page for each, saying what it shows and which panels to look at: see Example scenes.
The note at the bottom is for someone new: Ctrl+K finds anything, T opens the timeline, and the diamond beside a setting animates it. (It shows the keys as they are now, if you've changed them in Settings.)
Opening scenes and files
Your own scenes open from the File menu: Open recent has the last ten you saved, newest first, and Open… (Ctrl+O) shows every scene as a tile. Your Studio scenes open as you left them. A scene that wasn't made in Studio becomes the first layer of a new one, named after it with "remix" on the end.
Open a file… on the start screen, or From a file there, opens:
- a
.motionfile (see Motion files), - a scene's
.zip.
You can also drop a .motion file on the preview to open it. A picture or a video dropped there is added as a layer instead.
If the scene you're in has changes that aren't saved, Studio asks first: Save, Don't save or Cancel. It asks the same when you close the window.
If Studio stopped before you saved, the next time it starts it asks Open what you were working on? Open it brings back the copy it kept; save it to keep it. Let it go throws the copy away. How often that copy is kept is in Settings.
The window
The header
Three rows. The top one is the window's title bar:
- Motion's mark, then a tab for the start screen (Start) and one for each scene open, each with a colour of its own, and + for another. Click a tab to show that scene; each keeps its own layers, undo, pick, saved state and editor tabs. An amber dot means the scene has changes not saved; the × closes the tab (it shows under the pointer, and on the tab shown), asking first when there are changes. Ctrl+PgDown and Ctrl+PgUp go to the next tab and the one before, Ctrl+W closes one. Opening a scene that's already open shows its tab. The tabs open when Studio closes are opened again the next time it starts. Only the tab shown plays in the preview.
- The window's own minimise, maximise and close. Drag the bar by an empty part to move the window (to a screen's edge to snap it there), double-click it to maximise or restore, and drag the window's edges to size it.
Under it, the toolbar:
- The menus. File: New scene…, Open…, Open recent, Save, Close tab, Export (Motion file (.motion)… or Folder as a .zip…) and Settings…. Edit: Undo, Redo, Cut, Copy, Paste, Duplicate, Delete and Search everything…. Scene: Add layer, Add object, Scene settings…, Run the script, Use as wallpaper (with Open Motion Player…) and Publish…. While an editor's tab is shown, its own menu takes the Scene menu's place: Graph, Material, Script or Particles. Window: each panel, Layouts (with Save the layout as… and Delete a saved layout), Reset layout, floating or docking the panel, and Next panel (Ctrl+Tab). Help: Documentation, Keyboard shortcuts, Open-source licences, Report a bug… and About Motion Studio. Each item shows its keys.
- Search everything (Ctrl+K), the command palette, in the middle.
- Publish (see Publishing) and Use as wallpaper.
The third row is the scene's editor tabs: Scene first, then each editor open for it (see The editors).
The scene's name is in its settings (Scene at the top of the Outliner); its tab shows it.
Use as wallpaper saves the scene and puts it on your desktop. With more than one screen it asks where: On every screen, Across all the screens, as one picture, or Only on screen one of them.
The Scene tab
The Scene tab is where you build the scene: the Outliner on the left, the preview in the middle, the settings on the right, and one dock across the bottom of the window with Assets, Timeline, Mixer and Console. Ctrl+Space folds the dock away and brings it back. Until you drag it, the dock takes about a third of the window's height; once dragged it keeps its size, and a double-click on the line above it has it follow the window again.
The Outliner: everything in the scene as one tree. At the top, Scene: click it for the scene's own settings, its name and the bloom over everything, its script and physics. Under it, when the scene has objects or templates, Objects, each with its template; then the layers and folders, and what's in them (a 3D scene's items, a particle system's emitters). See Layers and folders and Objects and templates.
The preview
In the middle is the scene on a screen of the shape you pick, drawn by the same engine the desktop uses. Under it, the transport:
- Play or pause, and To the start.
- Timeline, which opens the timeline in the dock (T).
- Try it: the pointer and clicks go to the scene, as they would on the desktop, instead of moving layers.
- The clock: seconds, while the timeline is shorter than a minute, else minutes and seconds.
- How fast the preview draws, and how much drawing the scene asks for, as screens' worth a frame. Under 4 suits any computer; over 8 wants a proper graphics card. See Battery and performance.
- What the scene hears: Sound (what's playing on the computer), Pretend (a made-up beat to design with) or Muted. Click to go round them. See Sound.
- Hear: plays the scene's sounds in the preview, at half volume.
- Details: the frame rate, frame times and the graphics card's clocks over the preview.
- The screen's shape: 16:9, 16:10, 21:9, 4:3, 32:9 (two screens side by side), 48:9 (three) and 9:16 (a phone). Where the bar has no room for them, they fold into one button. The shape is only for the preview; to make a scene for one size, set Canvas in the scene's settings.
Short messages about what has happened show at the top of the preview for a few seconds.
The settings
On the right is the inspector: the picked layer's settings, or the scene's when Scene is picked. See The inspector.
The panels
Every panel of the Scene tab is a tab you can drag to another place, split beside another, or float in a window of its own (to put on another screen):
- Assets: the scene's files and what it keeps, and your library. See Assets.
- Timeline: keyframes and the settings that move. See Keyframes and the timeline.
- Mixer: the scene's sounds. See Sound.
- Console: what the scene's logic logged, with a red count when there are errors. See The console.
- Materials: the scene's materials. See Materials and shaders.
- Files: a web project's files. See Web pages and projects.
Window › Layouts sets the panels out for animating, scripting, shaders or sound, or compactly, and Reset layout puts them back as they came.
The editors
The editors don't dock: each opens as a tab of its scene, in the row under the toolbar, and fills the window under it, with a dot of its kind's colour:
- Event graph: the visual script. See Visual scripts.
- A script file, such as
script.ts, in the code editor. See Scripts. - A material or a Shader layer, in the shader editor, named after it. See Materials and shaders.
- A particle system, named after it or its layer. See Particle systems.
Whatever opens an editor opens its tab, so a Shader layer's Open the editor opens a tab for that layer's shader. Click Scene to go back to the scene, and the tab's × to close the editor. F11 has the editor fill the whole screen. Each scene keeps its editor tabs, and they come back with it the next time Studio opens it.
Assets
Assets, in the bottom dock (or beside the layers or the settings, from its dock button or Settings), is everything the scene holds, and your library: This scene and the Library in its tree down the side, the kinds of file along its toolbar, and the open folder's files as Tiles or a List.
- Each file shows what it is: a picture itself, a frame of a video, a model drawn from three-quarters in front, a font's letters, a sound's waveform, a material through its shader. A video's or a sound's length is on its tile.
- The kinds along the toolbar show one kind of file at a time (each with how many there are); search finds files by name. The order is by name, kind, size or when it changed, from the order button or the list's headings.
- The list shows each file's kind, details (a picture's size, a video's length, size and frame rate, a sound's rate, a model's triangles), size, when it changed and which layers use it.
- Beside the files, the picked file's details: its picture, what it is, where it is, and the layers that use it, each a link that picks the layer. Its buttons make a new layer with it, put it on the picked layer, rename it, show it in Explorer (or the file manager) and delete it.
- Ctrl or Shift with a click picks several, and Ctrl+A all of them, to delete together; deleting says first which layers use them.
- Drag files in from Explorer to bring them into the open folder, and drag a file onto the preview or a layer to use it, or onto a folder to move it there. Double-click a file to open it. Add makes a folder, a material, a particle system, a template, a TypeScript script module, a web page or a node pack, or brings in files or something from your library.
The command palette
Search everything (Ctrl+K) finds anything in one list:
- Studio's actions, grouped as Settings groups their keys (File, Edit, View, Window, Timeline, Layers, Script), each with its keys as they are now: save, undo, new project, open, export, use as wallpaper, play or pause, the timeline, new folder, put in or take out of a folder, make an object or a template of the layer, publish, and the rest.
- Window: each panel.
- Layer: every layer in the scene, to pick it.
- Object: every object in the scene, to pick it; and Place each template.
- New layer: every kind of layer, to add one ("Add Rain").
- Setting: the picked layer's settings, which tells you which card it's in.
Type a few words; every word has to match. Up and Down move, Enter runs, Esc closes.
Keyboard shortcuts
These are the keys as they come. Every one can be changed in Settings, under Keys, where the code editors' and the graphs' keys are too.
| Keys | What it does |
|---|---|
| Ctrl+K | Search everything |
| Ctrl+S | Save |
| Ctrl+Z | Undo |
| Ctrl+Shift+Z or Ctrl+Y | Redo |
| Ctrl+N | New scene (the start screen) |
| Ctrl+O | Open a scene |
| Ctrl+W | Close the tab |
| Ctrl+PgDown / Ctrl+PgUp | The next scene tab, or the one before |
| Ctrl+Shift+W | Use as wallpaper, on every screen |
| Ctrl+Shift+P | Publish |
| Ctrl+Tab / Ctrl+Shift+Tab | The next panel, or the one before |
| Alt+1 to Alt+9 | Show a panel: Outliner, Inspector, Assets, Timeline, Logic, Code, Shader editor, Mixer, Console |
| Ctrl+Space | Fold the bottom dock away, or bring it back |
| F11 | Have the editor fill the screen |
| T | Show or hide the timeline |
| Ctrl+C / Ctrl+X / Ctrl+V | Copy, cut or paste the layer (pasted above the picked one, in this scene or another) |
| Ctrl+D | Duplicate the layer |
| Delete | Delete the layer (Ctrl+Z brings it back) |
| Ctrl+Up / Ctrl+Down | Move the layer up or down |
| Ctrl+G | Put the layer in a folder |
| Ctrl+Shift+G | Out of the folder, or unfold a folder |
| Ctrl+Shift+N | New folder |
| Ctrl+L | Lock or unlock the layer |
| Arrow keys | Nudge the layer; with Shift, ten times as far |
| Ctrl+Enter | Run the script |
| Ctrl+Shift+E | Open or close the script editor |
T, Delete and the arrows do nothing while you're typing in a box. Undo remembers the last 200 changes.
Narrow windows
In a window under 1000 pixels wide, the layers and the settings fold away behind two buttons in the header, and the preview gets the room; the dock's tabs become one button with a menu. Narrower still (a phone held upright), the header keeps a few buttons and puts the rest in its ⋯ menu, and the layers or the settings, when opened, take the whole width.
Last changed 2 November 2026. Something wrong here? Tell us.