Keyframes and the timeline
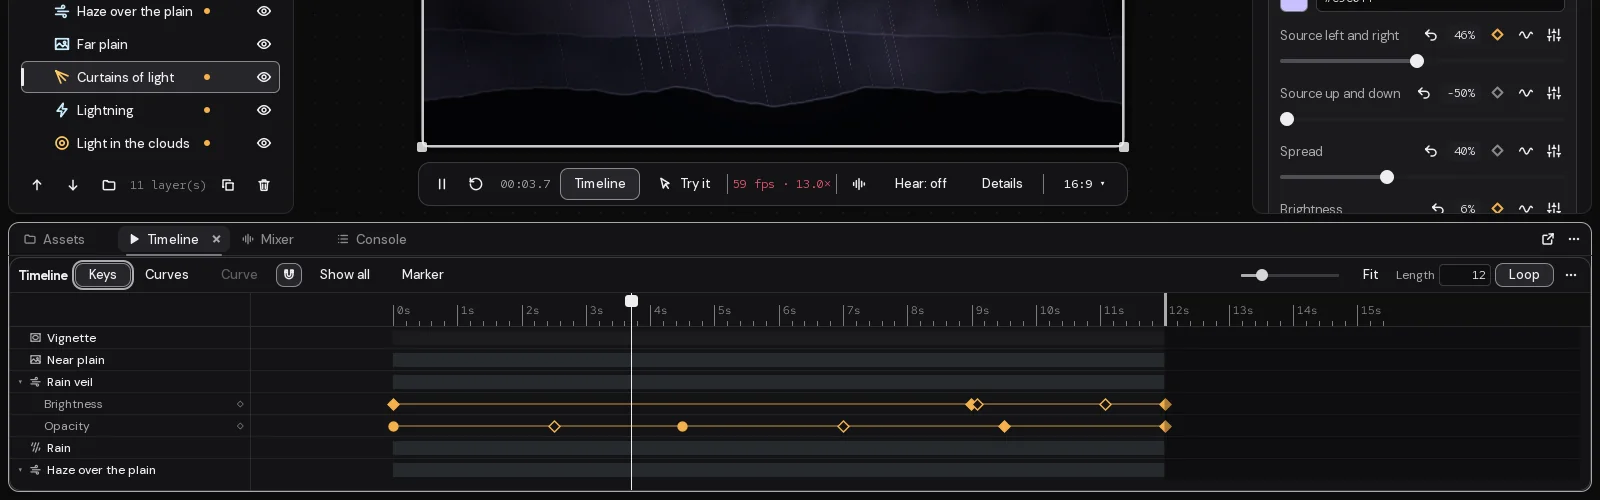
There are three ways to make a scene move: the movement layers have of their own, a setting that moves on its own (the wave), and keyframes on the timeline. This page covers the last two, and the timeline where you see and change them.
Try it: Storm Front (keys and easing in a looping timeline).
Most layers already move: motes drift, aurora flows, rain falls. Their speed is a setting. The Motion card every layer has adds drift, pulse, breathe, sway and spin on top (see The inspector). What follows is for when you want a particular setting to change.
One clock
Everything in a scene follows one clock. In Studio, it's the time under the preview; on the desktop, it's the wallpaper's own. When the wallpaper pauses (a window covers it, or the computer is on battery and you've asked it to pause), the clock stops, and the scene picks up where it left off.
Under the preview:
- Play or pause. Paused, nothing moves, and the settings show their values at that moment.
- To the start puts the clock back to 0.
- The clock, as minutes and seconds.
Moving on its own: the wave
Click the wave beside a slider or a colour. The setting starts moving between its own value and another, and a box opens under it:
- Follows: Time, The sound, A sensor or The weather.
- Moves to: the other value. For a colour, pick one of the swatches.
- Every: how long one round takes, from half a second to a minute. It starts at 6 seconds.
- Curve: the way it moves. Wave eases there and back; Loop goes there and jumps back; Bounce goes there and back at an even pace; Steps goes there in steps.
- Offset: where in the round it starts, so two settings with the same timing don't move together.
Click the wave again to stop it; the setting goes back to its own value.
Following the sound
With Follows on The sound, quiet gives the setting's own value and loud gives the other one (Loud gives).
- Part: Bass, Middle, Treble, All (the whole sound) or Beat, a pulse on each beat.
- Answers: Straight, Gently (slow to start) or Quickly (quick to start).
In Studio, the button under the preview says what the scene hears: what's playing on the computer, a made-up beat to design with, or nothing. See Sound.
Following a sensor
With Follows on A sensor, the setting follows the reading of one of the scene's sensors: low gives the setting's own value, high gives High gives. Sensor picks which, by the name it's shared as; listen to one on the inspector's Sensors tab first. See Sensors and watches.
Following the weather
With Follows on The weather, the setting follows the weather for the place picked in Settings › Weather and calendar, the same weather a Weather layer shows: Reading picks the warmth (-10 to 35 °C), the wind (up to 60 km/h), the rain, the cloud or the daylight. Low gives the setting's own value, high gives High gives. Until a place is picked and the weather has come, the setting keeps its own value.
Keyframes
A keyframe is a setting's value at a moment. Between two keys, the setting moves from one value to the other. Sliders, colours, whole numbers and colours with alpha can have keyframes.
- Pick a layer.
- Open the timeline (T, or Timeline under the preview).
- Click the ruler to go to a moment. The preview pauses there.
- Set the setting where you want it, and click the diamond beside it.
- Go to another moment, change the setting, and click the diamond again.
Once a setting has keys, changing it anywhere on the timeline adds a key at the playhead, or changes the key that's there. So after the first key you can move the playhead and drag the slider.
The first key you add away from the start also keeps the setting's value as it was at 0, so it moves from there to your key.
The diamond is filled when there's a key at the playhead; click it then to take that key away. It's outlined when the setting has keys elsewhere. Clicking the diamond on a setting that moves on its own turns it into keyframes from there.
While the preview is paused, the inspector shows each keyed setting's value at the playhead.
The timeline
The timeline opens in the dock across the bottom of the Scene tab. It opens by itself when you open a scene that has keyframes. It works in a narrow dock and in a big one: at small sizes, the tools it has no room for are in ⋯.
Along the top:
- Keys or Curves: the keys over time, or the picked settings' values as curves (Tab switches).
- Curve: how the value comes to the picked keys.
- The magnet: snapping on or off (S).
- Show all: every setting of the picked layer, keyed or not, so you can key one from here.
- Marker: a marker at the playhead (M).
- The zoom (+ and -), and Fit: everything, or the picked keys, in view (Home or F).
- Length and Loop: how long the timeline is (half a second to an hour), and whether the keys start again at the end. Off, each setting stays where its last key left it.
Play, pause and the time are the transport under the preview, the same for the timeline.
The rows follow the Outliner: folders, then layers, then each layer's keyed settings. A 3D layer's items and a puppet's bones get a row each, with their settings under them. Settings that move on their own ("moves") show a stripe each round. A sound layer's Playing always has a row. Keyed mixer volumes are at the end, under Mixer. Click the arrow beside a row to fold it.
Click a row to pick its layer (or 3D item) in the Outliner and the inspector. Picking a layer elsewhere shows its row picked here. The diamond at the end of a setting's row adds a key at the playhead, or takes the one there away.
Folders don't get a row unless you ask for one, and you can leave any layer out: right-click its name and pick Hide from the timeline. Hidden lists what's left out; pick one to show it again.
Moving around
- Ctrl and the wheel zoom at the pointer. The wheel scrolls the rows; Shift and the wheel scroll through time. Drag with the middle button to move the view.
- Click or drag the ruler, or drag the playhead's handle, to go to a moment. The preview follows. Going to a moment pauses the preview.
- J and K go to the key or marker before and after the playhead.
Picking and changing keys
- Click a key to pick it, Shift-click to add one or take it away, or drag a box on an empty part of the rows.
- Drag picked keys to move them. They snap to frames, other keys, markers, the playhead and the range; a line shows where. Hold Alt not to snap.
- Left and Right move the picked keys a frame; with Shift, ten. With no keys picked, they move the playhead.
- Ctrl+C copies the picked keys and Ctrl+V pastes them at the playhead. Delete or Backspace takes them away, Ctrl+A picks every key on the rows shown, and Esc picks none.
- Double-click a row to add a key there, or a key to take it away. Right-click for the curve, copy, paste and delete.
All of these are in Settings › Keys, under Timeline, to change.
Easing
A key's curve is how the value travels from the key before to this one:
| Curve | What it does | Its mark |
|---|---|---|
| Straight | an even pace all the way | a diamond |
| Ease | starts slowly and arrives slowly; new keys have this (F9) | a round dot |
| Ease in | starts slowly and speeds up | an outlined diamond |
| Ease out | starts quickly and slows down | an outlined diamond |
| Step | holds the value before, and jumps at the key | a square |
| Custom | the shape you drag in Curves | a ringed dot |
Curves
Curves draws the picked settings (or the picked layer's) as lines over time, each fitted to the height. Pick a key to see its handles: drag a handle to shape the way in or out of it, and the key becomes Custom. A handle above or below the next key makes the value overshoot. Drag a key up or down to change its value, or along to change its time.
Markers, the range and the length
- Markers sit under the ruler. Drag one to move it, double-click it to name it, right-click to delete it. Keys snap to them. A scene's markers are saved with it.
- Play a range (in ⋯) makes the preview play round part of the timeline. Drag its ends on the ruler. The wallpaper always plays the whole length.
- The handle at the end of the ruler is the length: drag it to change it.
Keys repeat every time the timeline comes round, so a 10-second timeline plays its keys every 10 seconds for as long as the wallpaper runs. To make a slow change that holds, turn Loop off: the scene plays its keys once, and the settings stay at their last values.
Changing the length changes it for every keyed setting in the scene. Keep your keys inside the length: the timeline ends there.
What moves what
The Driven by tab in the inspector lists everything that moves the picked layer's settings, with a cross to stop each one. See The inspector.
For movement that answers clicks, the time of day or anything else, use the scene's logic: Visual scripts or Scripts.
Last changed 2 November 2026. Something wrong here? Tell us.