Effects and masks
Every layer can have effects: blurs, distortions, colour, film looks, and masks that limit where things show. They're on the Effects tab of the inspector. This page covers the quick effects, the effects stack, masks, and Adjustment layers. Each effect has its own page in the effects reference.
Try it: Rain on Glass (an effects stack), First Light (an adjustment layer and a mask).
The quick effects
At the top of the Effects tab is a folded card, Effects, with the effects every layer has as plain settings: Water, Wave, Glitch, Pixels, Blur, Colour split, Hue, Saturation, Brightness, Contrast and Tint. They cost nothing until you move one away from its default.
Because they're ordinary settings, they have the diamond, the wave and the sliders icon beside them: you can key them on the timeline, make them move with the music, or offer them in the wallpaper's settings. See Keyframes and the timeline.
The effects stack
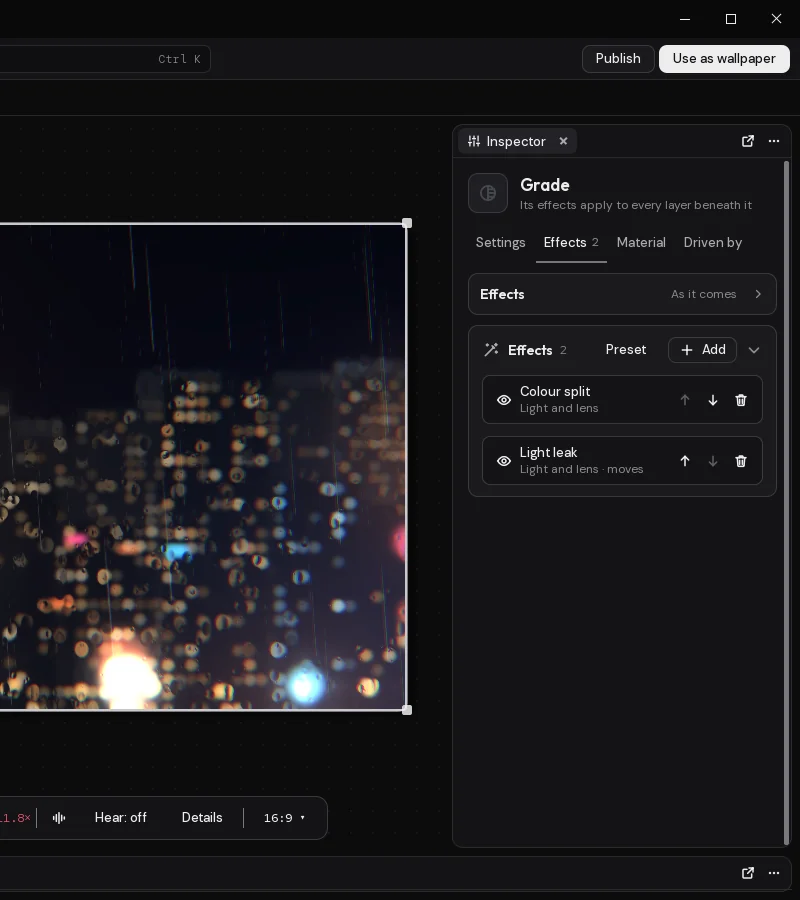
Under the quick effects is the stack: a list of effects that run in order, top to bottom, each on what the one before made. They run after the quick ones. A layer can have up to 16.
Adding an effect
Click Add on the stack's card. A list of every effect opens beside the inspector, in families. Type to search names and families first, then descriptions; Enter adds the first match. A new effect goes at the end of the stack, open, with its settings ready.
Changing one
Click an effect's name to open its settings, and again to fold them. Each effect has:
- Amount: how much of the effect, mixed with what it was given. 0 leaves the picture as it was.
- Blend: how the effect's picture goes over what it was given, with the same choices as a layer's blend (Normal unless you change it).
- Style, on the effects that come in several kinds: Blur is soft, one way, spin, zoom, tilt-shift or lens; Mask a shape, a gradient or another layer; and so on. Each style shows only its own settings, and a setting the styles share keeps its value when you change style.
- Its own settings. A few take a file: LUT (.cube) takes a
.cubeor.pngLUT, Displace by picture and Lens dirt take a picture. - Where it applies: its mask (below).
Under its name, each effect says its family, and "moves" when it changes on its own over time.
The settings in the stack have the diamond, the wave and the sliders icon too: key an effect's setting on the timeline, make it move on its own or follow the sound, the weather or a sensor, or offer it in the wallpaper's settings, where it's named after the layer and the effect ("Orbs: gaussian blur radius"). When you move an effect up or down the stack, its keys and offered settings go with it; take it out and they go too. A script sets one as the layer's effects.0.radius (the effect's place in the stack, counting from 0, then its setting).
Ordering, switching off, taking out
On each effect's row:
- The eye switches it off and on. Off, it costs nothing, and its settings are kept.
- Earlier in the stack and Later in the stack move it up and down. Order matters: a blur after a pixel effect softens the pixels; before it, the pixels come out sharp.
- Delete removes it.
An effect at Amount 0 costs nothing either.
The families
- Blur: Blur (Soft, One way, Spin, Zoom, Tilt-shift, Lens).
- Distort: Water and haze (Water, Heat haze, Turbulence), Wave, Displace by picture, Swirl, Bulge and pinch (Bulge, Pinch), Polar, Kaleidoscope, Mirror, Lens distortion, Shake, Look at the pointer (an eye that follows the pointer, or near and far parts moving apart by a depth picture).
- Stylize: Pixels, Glitch, Outline, Shadow (Behind, Inside), Emboss, Find edges, Posterize (Flat, Dithered), Halftone (Ink on paper, Its own colours), ASCII (Its own, One ink), Oil paint, Sketch, Cel shading, Shader (your own shader code over the layer, with its own settings, see Materials and shaders; several in a stack each draw on what the one before drew).
- Colour: Adjust colour (Hue, Saturation, Brightness, Contrast, Vibrance, Exposure, Gamma and White balance are its styles), Tint, Levels, Curves, Colour balance, Colour map (Gradient, Duotone, Black and white, Sepia), Channel mixer, LUT (.cube), Invert, Threshold, Selective colour.
- Light and lens: Colour split (From the middle, One way), Light leak, Glow (Bloom, Close glow), God rays, Lens dirt, Film grain, Scan lines, CRT, VHS, Vignette, Light sweep (a band of light passing over the picture now and then).
- Time: Echo, Motion blur, Strobe (Flash a colour, Blink out), Freeze frame.
- Mask and reveal: Noise dissolve, Mask (Shape, Gradient, Another layer), Wipe, Colour key (a colour made see-through, as a green screen is keyed out).
Older scenes open with their effects as the matching style (Gaussian blur and Zoom blur as Blur, Drop shadow and Inner shadow as Shadow, Hue, Saturation and the like as Adjust colour), and look exactly as they did.
Masks
There are three ways to limit where something shows.
A layer's own mask
The Mask card on the Settings tab fades the whole layer by a shape: Round, Band across, Band down, or Fade the top, the bottom, the left or the right, with Size and Softness. Each fade takes away the edge it names and keeps the opposite one: for stars in the sky above a horizon, Fade the bottom. It's the quickest way to soften a layer's edges.
Where an effect applies
Every effect in the stack has Where it applies. Limit to picks:
- Everywhere: the whole layer (the default).
- A shape: a Round, Box, Band across or Band down shape, with Where it is (a point on the screen), its Size across and down, its Turn and its Softness.
- A gradient: the effect fades out across a line through Where, at a Turn, with a Softness.
- Another layer: the effect applies where another Layer is. Read its Shape (where it's drawn at all) or Brightness (more where it's brighter).
Invert turns any of them round, so the effect applies everywhere but there. A blur limited to an inverted round shape, for instance, keeps the middle sharp and softens the edges.
Mask effects
The Mask and reveal family hides part of the layer itself, at its place in the stack: Mask keeps only what's inside a shape (style Shape), fades it out across a line (Gradient), or keeps only where another layer is (Another layer); Noise dissolve burns it away in patches with a glowing edge, and Wipe shows it up to a line that sweeps across. Change Shown or Gone from the scene's logic and they become transitions.
Adjustment layers
An Adjustment layer has no picture of its own: its effects apply to every layer beneath it. Put one at the top of the list to grade the whole scene, or lower down to leave the layers above it alone.
A new Adjustment layer starts as a colour grade. Its stack has a Preset button that fills the stack with a ready-made look, in place of what was there:
- Colour grade: levels, curves, colour balance and vibrance.
- Film: a film curve, grain, a light leak, a vignette and a little shake.
- Retro TV: a CRT, scan lines, colour split and grain.
- Dream: bloom, soft edges and a violet gradient map.
- Night vision: green, grainy, dark at the edges.
- Comic: posterized, cel shaded, with a halftone.
- Glass: blurred, bent, and glowing.
- Heat: haze, warm colours and bloom.
Change or take out any effect afterwards; a preset is a starting point.
The scene's finish
For a bloom or a grade over the whole wallpaper without an extra layer, pick Scene: its Bloom and Finish cards add bloom, hue, contrast, a tint, colour split at the edges, film grain and scan lines over everything. See The inspector.
Materials
An effect works on the picture a layer has already drawn. To change how a layer is drawn, with your own shader, give it a material on the Material tab. See Materials and shaders.
Last changed 2 November 2026. Something wrong here? Tell us.